¶ Disclaimer
Please read this manual carefully before using the Makera Z1(Z1&Z1Pro). Failure to read the manual may lead to personal injury, inferior results, or damage to the Makera Z1(Z1&Z1Pro) machine.
This manual is provided for reference purposes only. We reserve the right to modify or revise this manual, users can download the most up-to-date version of this manual on our website.
You should always monitor machines when in use. Milling cutters revolving in high-speed, unstable components or laser module in operation are dangerous to people without protection. Please carefully read the safety instructions below to avoid unnecessary harm.
¶ Safety Instructions
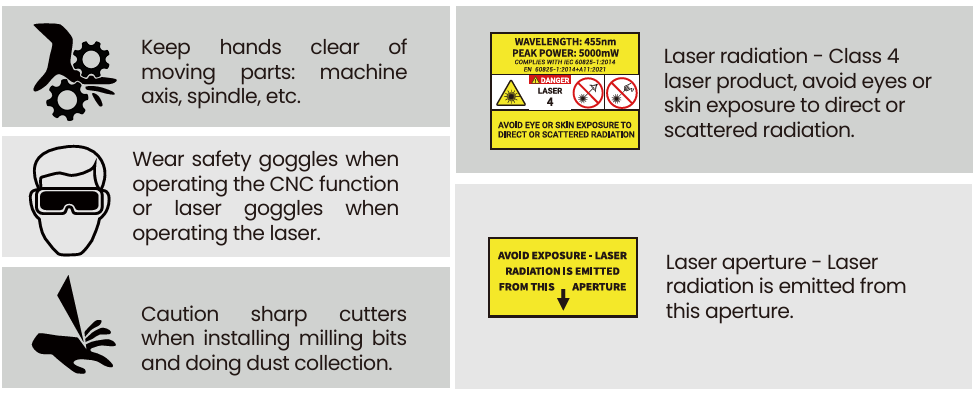
1. Always wear safety goggles when operating the machine, especially when the protective cover is open.
2. Always wear laser protection goggles when using the laser module.
3. Please wear hearing protection when Makera Z1(Z1&Z1Pro) is machining on the hard materials.
4. Do not leave your machine unattended while it is machining.
5. Please be aware of the sharpness of the milling bits during installation, dust collection, and other operations.
6. Milling will generate heat. Inappropriate parameters will cause fire hazards. Make sure an extinguisher is in your vicinity.
7. Some materials are harmful to people when machining, such as carbon fiber. Please wear a face mask and connect a vacuum for dust collection.
8. Do not expose this machine to rain or wet conditions.
9. It is not allowed for children to operate this product. Only skilled personnel are permitted to use this product.
If an emergency occurred in machining, such as the workpiece being loose from holding, components damaging, unusual light or sound coming from the machine, etc. Press the main button or E-Stop button, all ongoing procedures will stop immediately, or cut off the power to shut it down.
Makera Z1(Z1&Z1Pro) has a safety option that allows the machine to automatically stop working when opening the cover, which is useful for schools or work environments where children may reach.
¶ Desktop CNC Safety
- If an emergency occurred in machining, such as the workpiece being loose from holding, components damaging, unusual light or sound coming from the machine, etc. Press the main button or E-Stop button, all ongoing procedures will stop immediately, or cut off the power to shut it down.
- Makera Z1& Makera Z1 Pro has a safety option that allows the machine to automatically stop working when opening the cover, which is useful for schools or work environments where children may reach.
- The use of materials not supplied or specified for Makera's desktop CNC equipment may require additional protective and safety measures. Always review the Safety Data Sheet (SDS) provided by the material supplier for detailed safety instructions before use.
¶ Compliance
¶ FCC Compliance
This equipment has been tested and found to comply with the limits for a Class B digital device, pursuant to part 15 of the FCC Rules. These limits are designed to provide reasonable protection against harmful interference in a residential installation. This equipment generates, uses and can radiate radio frequency energy and, if not installed and used in accordance with the instructions, may cause harmful interference to radio communications. However, there is no guarantee that interference will not occur in a particular installation. If this equipment does cause harmful interference to radio or television reception, which can be determined by turning the equipment off and on, the user is encouraged to try to correct the interference by one or more of the following measures:
- Reorient or relocate the receiving antenna.
- Increase the separation between the equipment and receiver.
- Connect the equipment into an outlet on a circuit different from that to which the receiver is connected.
- Consult the dealer or an experienced radio / TV technician for help.
Caution: Any changes or modifications to this device not explicitly approved by manufacturer could void your authority to operate this equipment.
This device complies with part 15 of the FCC Rules. Operation is subject to the following two conditions:
(1) This device may not cause harmful interference, and (2) this device must accept any interference received, including interference that may cause undesired operation.
This equipment complies with FCC radiation exposure limits set forth for an uncontrolled environment. This equipment should be installed and operated with minimum distance 20cm between the radiator & your body.
¶ ISEDC Compliance
This device complies with Innovation, Science and Economic Development Canada License exempt RSS standard(s). Operation is subject to the following two conditions:
(1) this device may not cause harmful interference, and (2) this device must accept any interference received, including inter ference that may cause undesired operation of the device.
Le présent appareil est conforme aux CNR d' Innovation, Sciences et Développement économique Canada applicables aux appareils radio exempts de licence. L'exploitation est autorisée aux deux conditions suivantes : (1) l'appareil nedoit pas produire de brouillage, et(2) l'utilisateur de l'appareil doit accepter tout brouillage radioélectrique subi, même si le brouillage est susceptible d'en compromettre le fonctionnement.
The device is compliance with RF exposure guidelines, users can obtain Canadian information on RF exposure nd compliance. The minimum distance from body to use the device is 20cm.
Le présent appareil est conforme Après examen de ce matériel aux conformité ou aux limites d’intensité de champ RF, les utilisateurs peuvent sur l’exposition aux radiofréquences et compliance d’acquérir les informations correspondantes. La distance minimale du corps à utiliser le dispositif est de 20cm.
¶ Safety Labels
¶ Unboxing
The mass of the box weighs more than 30Kg/ 60lb. The net weight of the Makera Z1(Z1&Z1Pro)desktop milling machine is around 20Kg/40lb. We suggest moving this machine by at least two people (with gloves) to ensure both personal and machine’s safety. Please make sure your desk is sturdy enough and has no less than 60 x 60 cm space to place this machine.
https://youtu.be/lad2MBLVIDE
¶ Unboxing
After opening the package, remove the protective materials from the top and sides. With assistance, carefully lift the machine out using the bottom handles and place it on a stable, level surface.
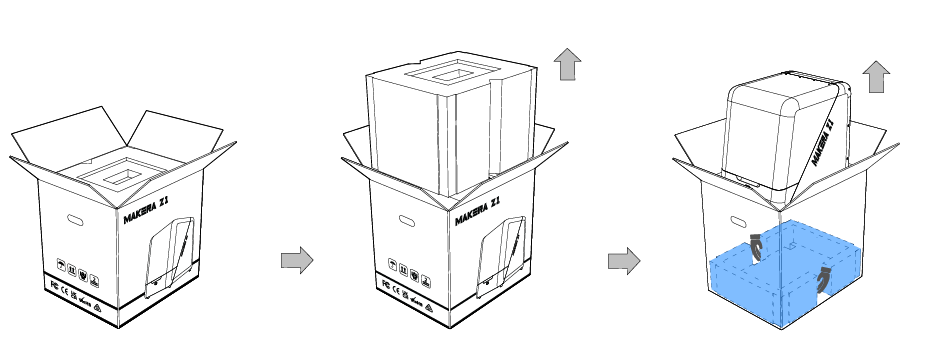
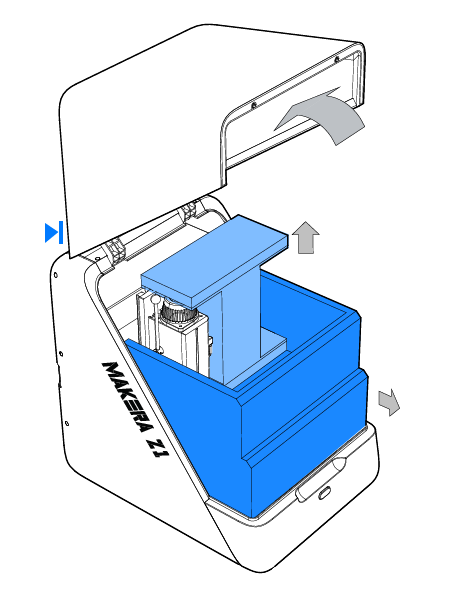
Follow the illustration to open the machine cover and remove the internal protective foam and accessories
Note:
1.Due damping mechanism, the cover must be opened to a near-vertical position to stay in place. Do not force it beyond this angle, as it may cause damage.
2. Keep the packaging materials for future use. Keep plastic bags away from children to prevent suffocation.
¶ Machine Overview
¶ What‘s Included
¶ Accessories & Materials
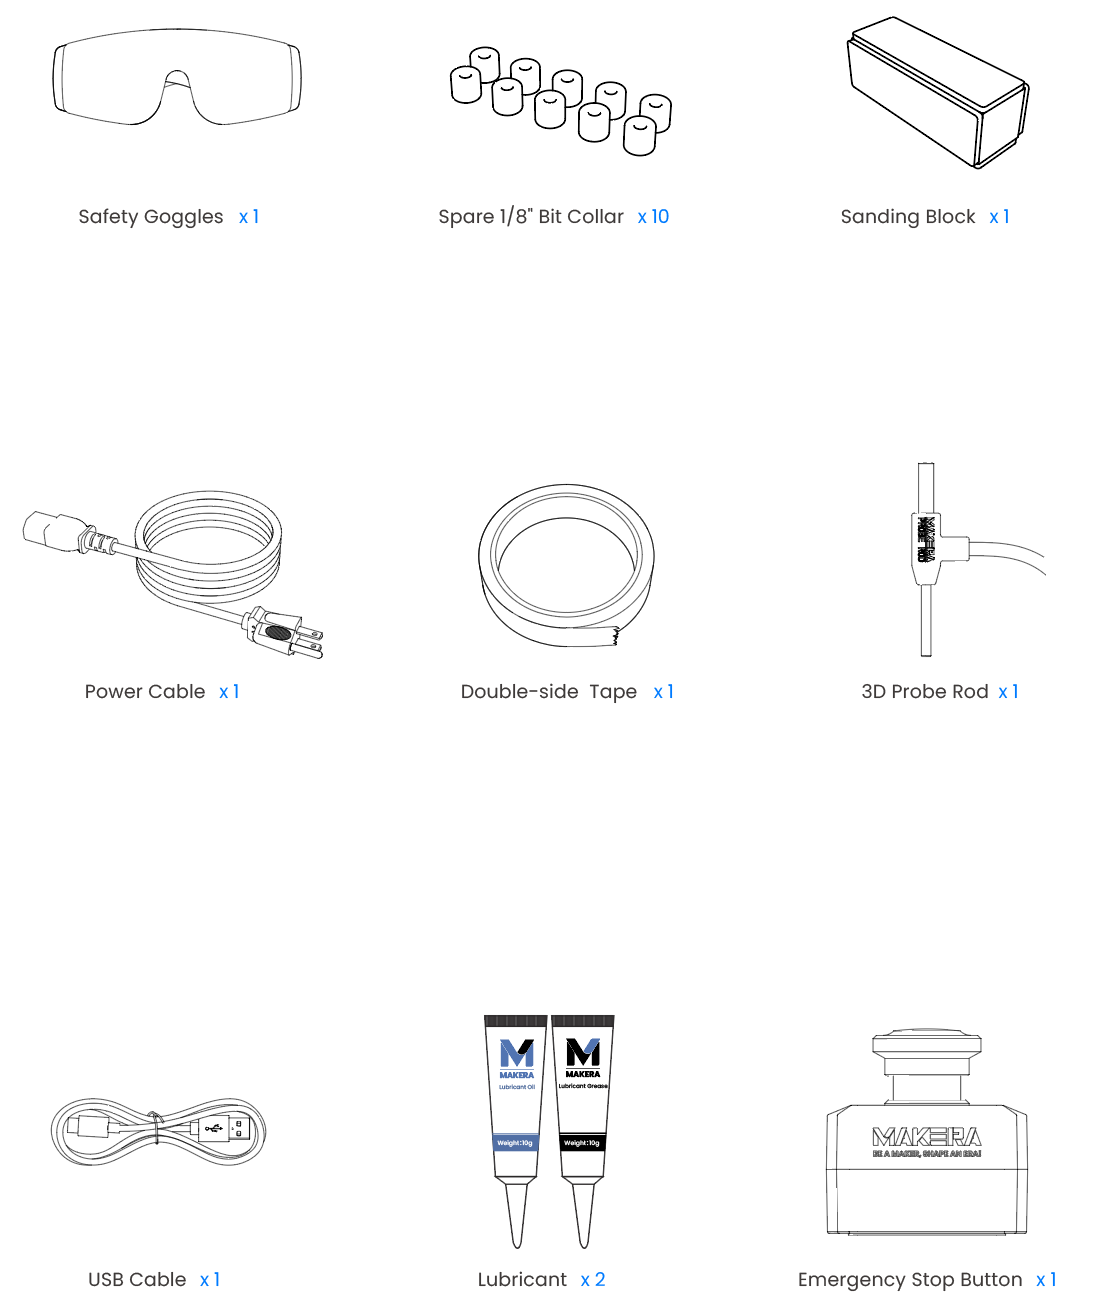
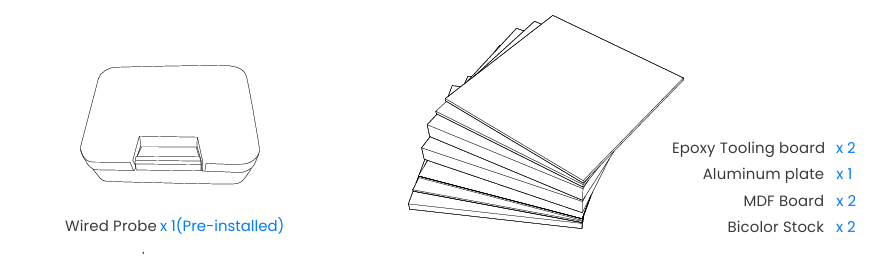
¶ Material Dimension Information
Epoxy Tooling board:100mm*100mm*10mm
Aluminum plate:100mm*100mm*5mm
MDF Board:100mm*100mm*2mm
Bicolor Stock:100mm*100mm*1.3mm
Note:
- Due to certain tolerances in material cutting, please use a caliper (or other measuring tools) to verify dimensions before machining.
- CNC machining is a subtractive manufacturing process. We recommend developing the habit of confirming material dimensions before machining, as this will help improve your machining results.
¶ Tool Kits
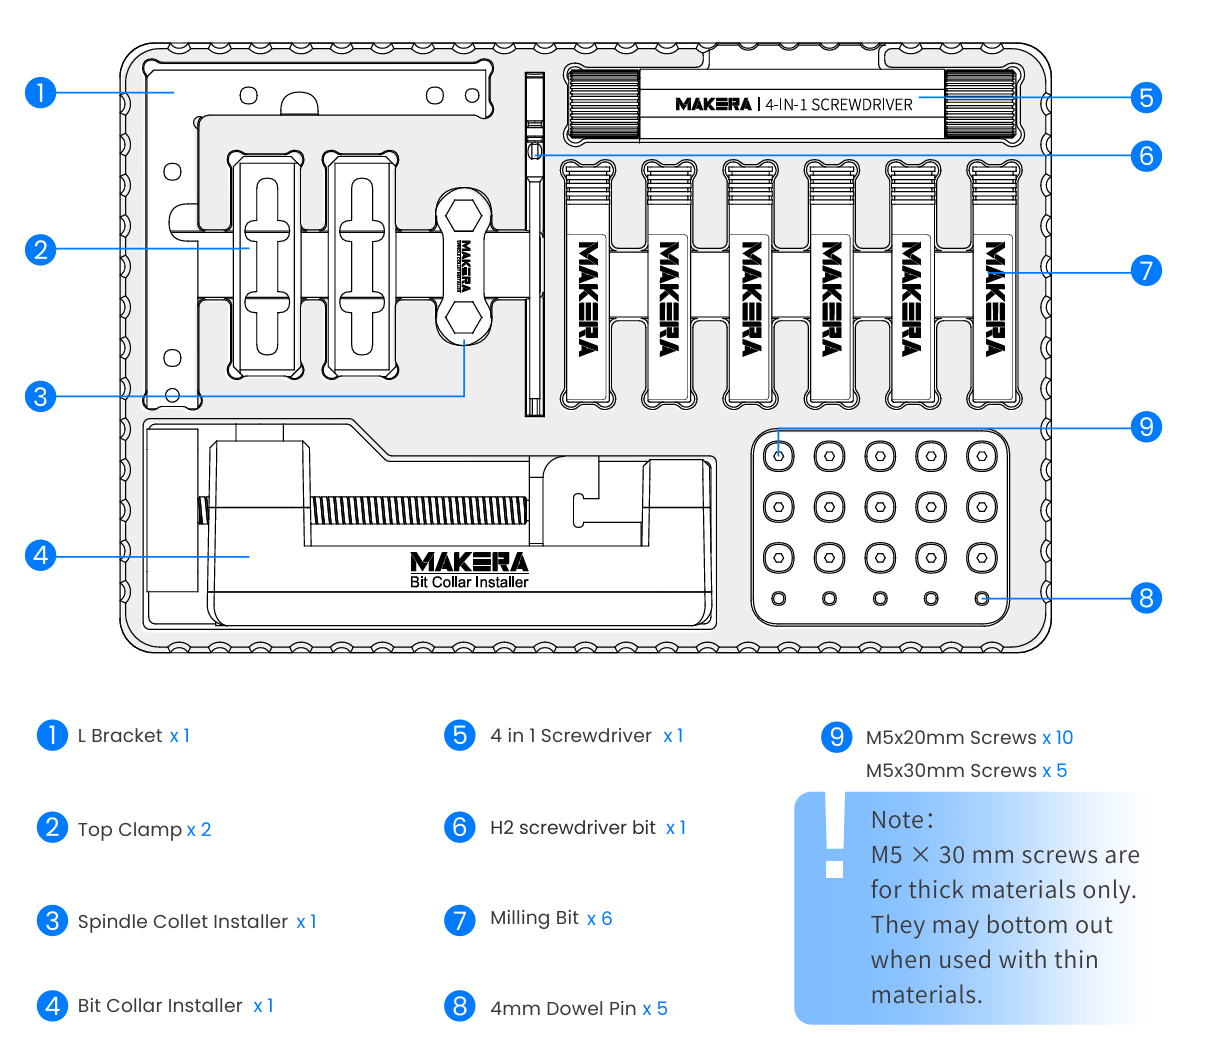
¶ Basic Operations & Tools
¶ Tool Change
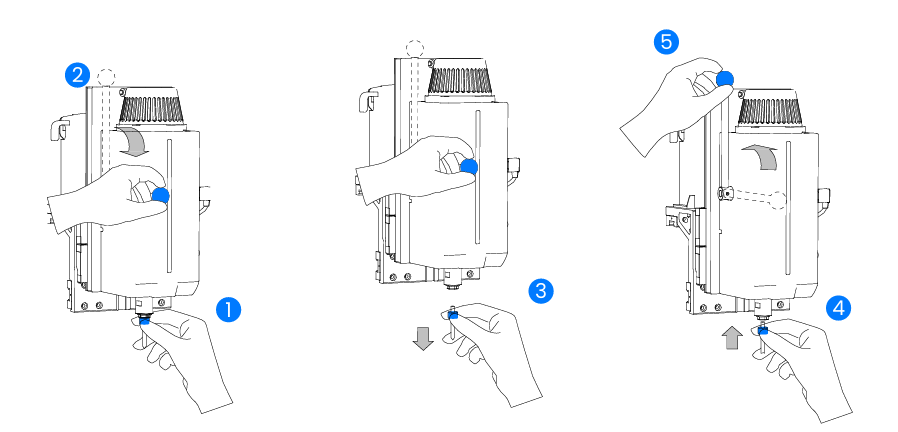
Quick Tool Change is a key feature of Makera Z1(Z1 & Z1Pro), allowing you to replace tools in just a few seconds and significantly improve workflow efficiency.
Operation Steps
1. Hold the tool collar just below the spindle collet with your right hand. (We recommend using tools with a collar to help position the shank length and reduce the risk of finger injury.)
2. Press down the lever with your left hand to release the tool.
3. Gently remove the tool with your right hand
Note:
Do not pull it out forcefully to avoid injuring your fingers
4. Insert the new tool into the spindle collet.
5. Release the lever with your left hand to let it return automatically, then release your right hand.
Note:
1. A 3.175 mm protective rod is pre-installed in the collet at the factory.Please replace it with an actual tool before use.
2. CNC tools are sharp. Handle with care to avoid injury.
¶ Workholding & Positioning
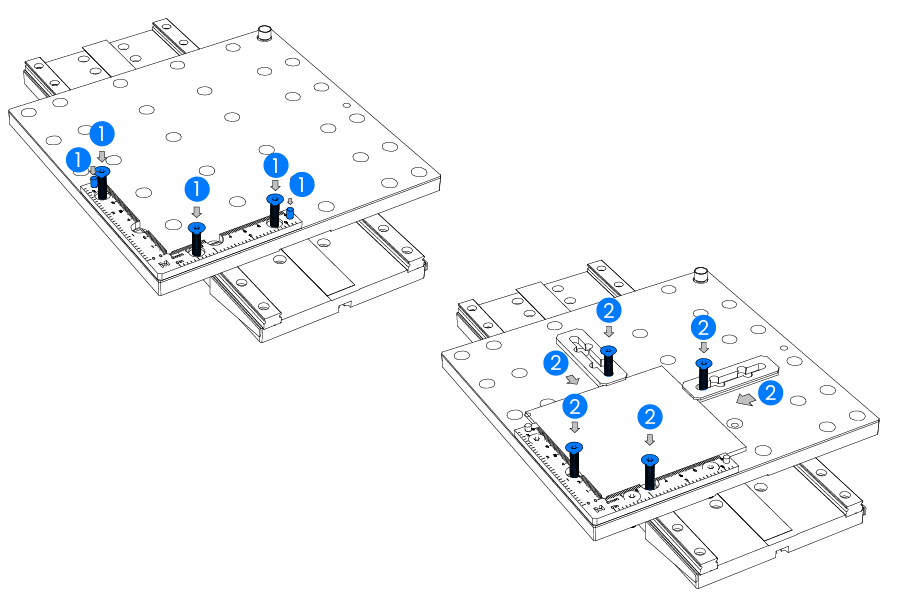
Makera Z1 (Z1 & Z1Pro) simplifies workholding and XYZ positioning with its anchor-based system and automatic Z-axis probing. Simply place and secure the workpiece at the anchor position as shown, and the system will automatically detect the lower-left corner as the machining origin (commonly used zero point).
Operation Steps
1. Install the L-Bracket
Secure the L-bracket at the anchor position using two 4 mm dowel pins and three M5×20 screws (Use longer screws for the thick bracket)
Place the workpiece against the inner side of the bracket for initial positioning
2. Secure the Workpiece
Insert two M5 screws into the semi-circular openings of the bracket to fix the lower-left corner
Use top clamps to secure the upper-right corner and complete the setup.
Note:
1. Do not overtighten the top clamps to avoid damaging the clamps or the workpiece
2. Use screws of appropriate length based on the workpiece thickness to prevent scratching the base plate
¶ Dust Collection
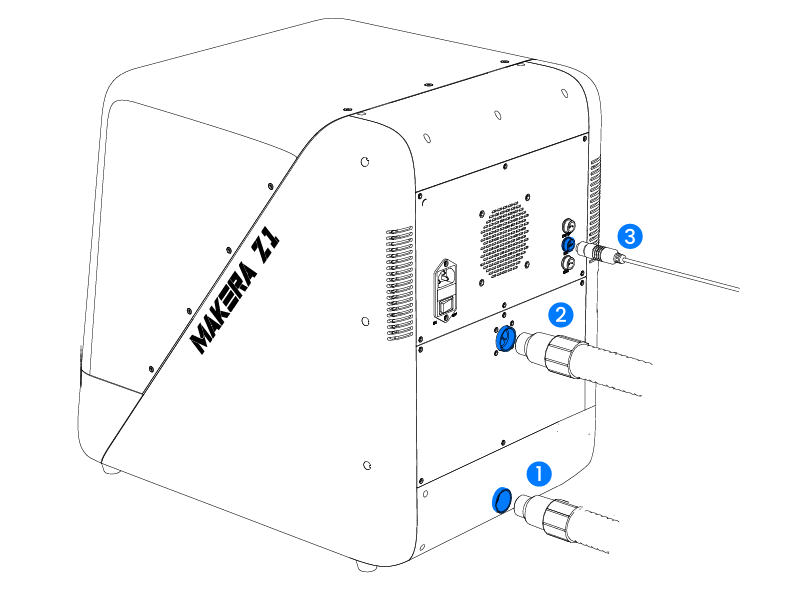
Makera Z1 (Z1 & Z1Pro) features an innovative dust collection system. The spindle fan directs chips below the work surface, where external airflow and machine vibrations guide them into the bottom dust tray. An external dust collector then removes the debris, keeping the workspace clean.
Operation Steps:
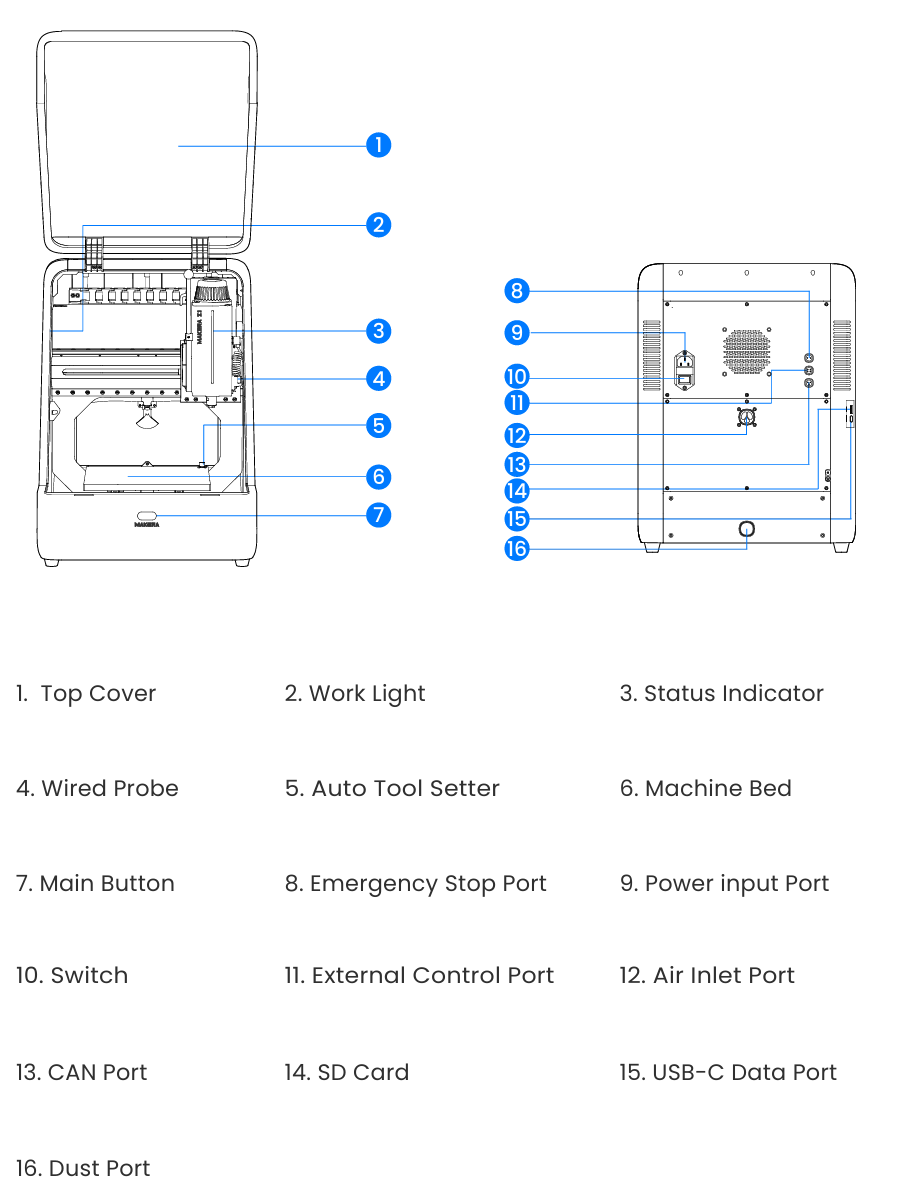
1. Connect the inlet of the external dust collector to the lower rear Dust port (Ø22 mm).
2. Connect the outlet of the dust collector to the upper rear Air Inlet Port (Ø22 mm).
3. (If available) Connect the control cable to the rear external control port.
4. Enable auto air blow and dust collection in the control software during operation.
Note:
For best performance, use a dust collector with external air assist (e.g., Makera Cyclone Dust Collector Lite). Refer to the dust collector manual for detailed instructions.
¶ Spindle Collet Change
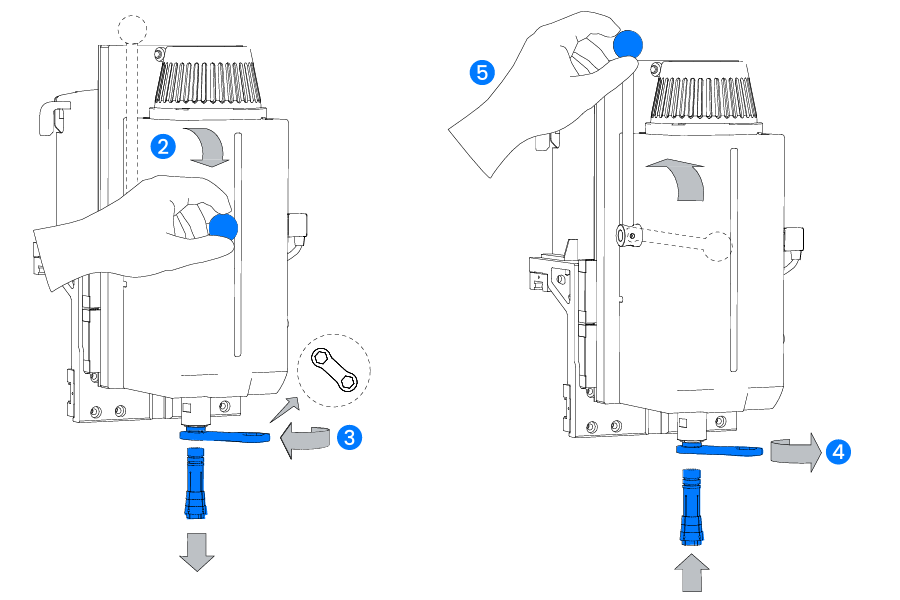
Makera Z1 (Z1 & Z1Pro) comes with a standard 1/8" (3.175 mm) spindle collet, which fits most commonly used tools for desktop CNC machines. If you need to use tools with different shank diameters, please replace the collet with the appropriate size.
Operation Steps:
1. Refer to the Tool Change section and remove the current tool.
2. Press down the tool change lever to lock the spindle (prevent rotation).
3. Use the Spindle Collet Installer from the toolbox to remove the existing collet.
4. Install the new collet and ensure it is securely seated.
5. Release the lever with your left hand to let it return automatically, then release your right hand.
Note:
1. Make sure the tool shank matches the collet size after replacement.
2. When using accessories such as the wired probe, 3D probe rod, or 3D probe, replace the shank with the corresponding size as well.
¶ Wired Probe
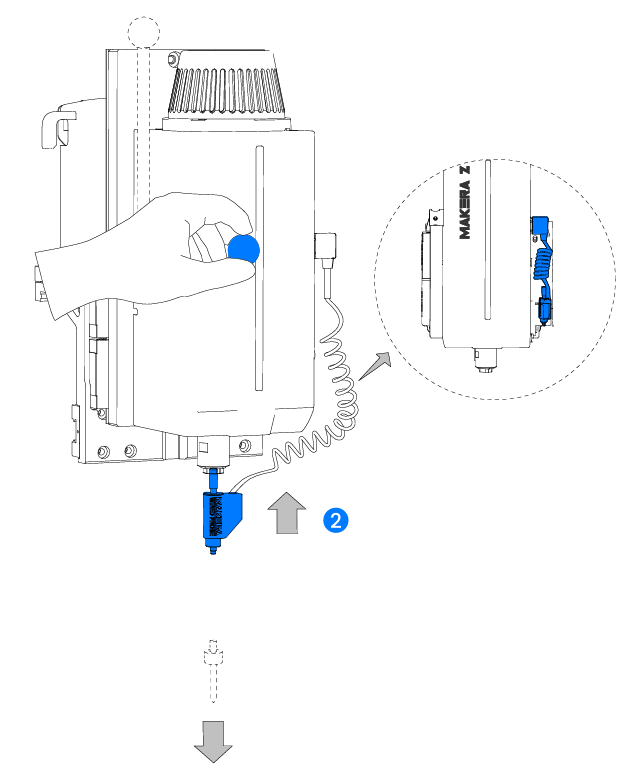
The wired probe supports automatic Z-axis probing, surface leveling, and machining area scanning.When used with Makera Z1(Z1 & Z1Pro)’s anchor-based system, it enables easy XYZ positioning and simplifies the CNC workflow.
Operation Steps;
1. Follow the prompt in the control software to switch to the probe.
2. Refer to the Tool Change section to remove the current tool and install the wired probe.
3. Click Continue or press the main button to start probe calibration; the system will complete the remaining steps automatically.
Note:
Double-click the probe to activate the laser indication and check its current position。
¶ 4-in-1 Screwdriver
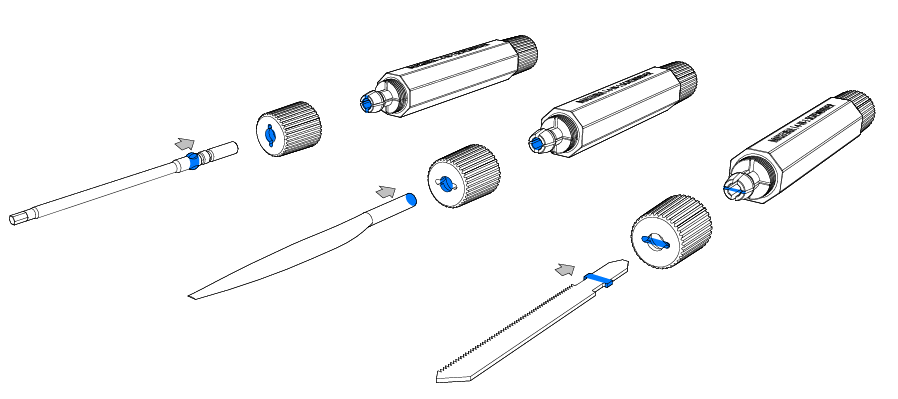
Makera 4-in-1 Screwdriver integrates multiple functions—including a screwdriver, hand saw, and hand file—into one compact tool. With a single tool, you can quickly switch between clamping, removal, and finishing tasks, making it an essential companion for your CNC workflow.
The collet nut features a clearance slot design, allowing fast tool changes without fully removing the nut.
For the file attachment, simply loosen the nut, insert the tool, and tighten it. For screwdriver bits and the saw attachment, loosen the nut, align them with the wide or narrow slot in the collet, insert, and tighten securely.
Note:
Always ensure the tool is firmly secured before use to prevent it from coming loose during operation.
¶ Emergency Stop Button
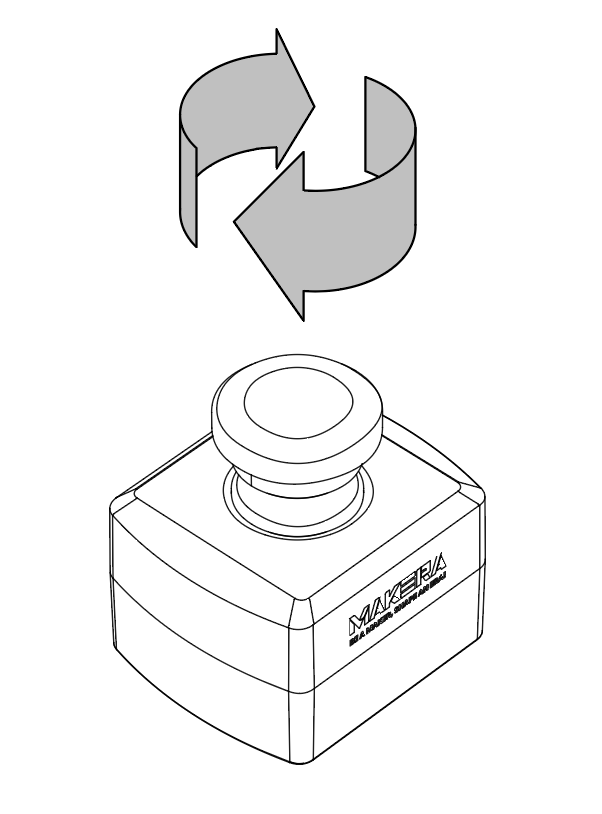
Connect the emergency stop button cable to the emergency stop port on the rear of the machine.
In case of an emergency (such as tool breakage, jamming, or workpiece loosening), press the emergency stop button to immediately stop the machine.
The emergency stop is a latching switch. Before powering on, turn it clockwise to release.
The main button also functions as an emergency stop by default and can be used to stop the machine when needed.
¶ Bit Collar Installer
The Bit Collar Installer is used to mount bit collars onto milling bits, helping control the clamping length, improve tool change efficiency, and reduce the risk of injury.
It supports installation and removal for various bit and collar sizes, enabling easy reuse.
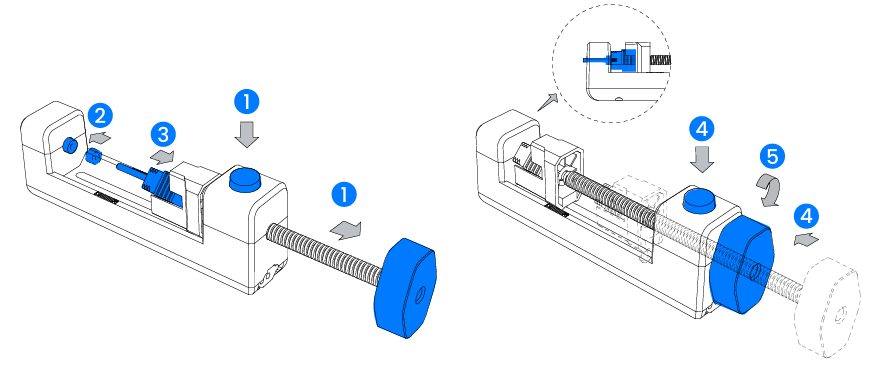
Installing the collar:
1. Press the spring button and pull the pusher to the outermost position.
2. Place the collar into the front socket.
3. Position the milling bit (with cap) onto the pusher.
4. Push forward to align the bit with the collar.
5. Turn the screw knob to press the bit into the collar (Default exposed length is ~12 mm; adjust as needed).
Removing the collar:
1. Press the spring button and pull the pusher outward
2. Insert the removal pin from the bottom into the pusher
3. Place the bit with collar into the front socket
4. Push forward to align the removal pin with the bit
5. Turn the screw knob to eject the collar
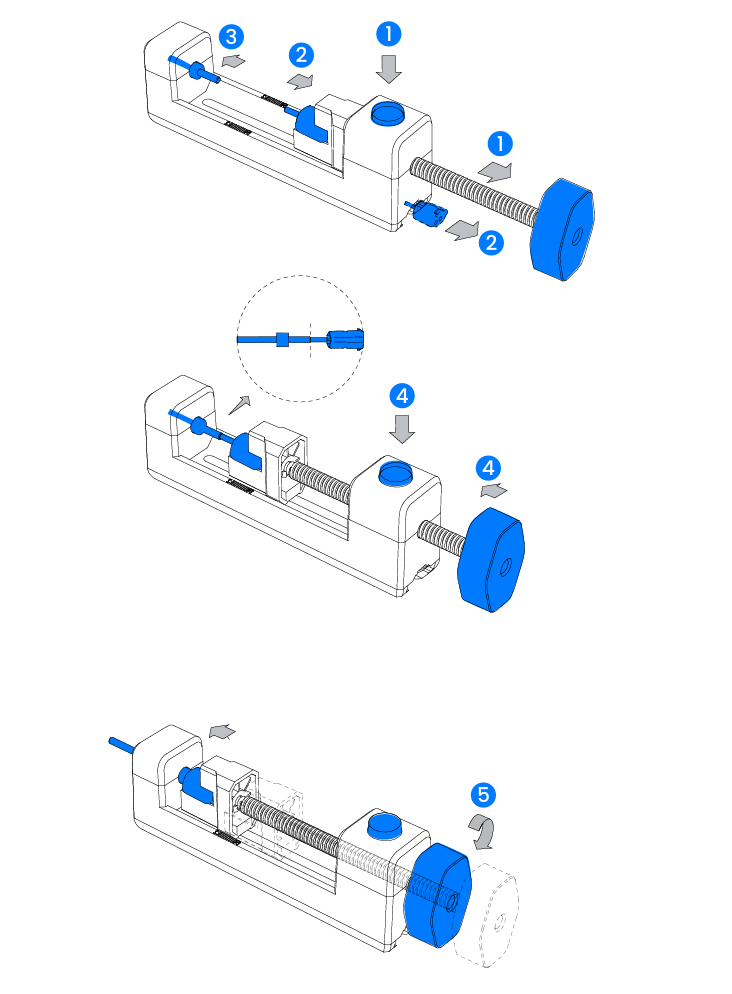
Note: During installation, the pusher will pass through the bit’s protective cap. This is normal.
¶ 3D Probe Rod
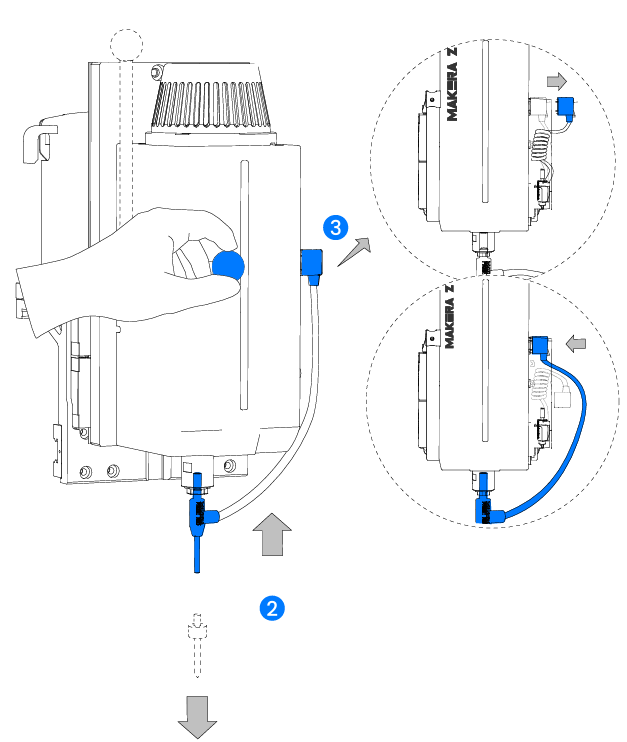
The 3D Probe Rod enables automatic X, Y, and Z axis probing on conductive materials. It is ideal for regular shapes (such as square or round workpieces) when performing edge finding or center finding in custom fixturing setups like vises.
Operation Steps:
1. Follow the on-screen instructions to switch to the 3D Probe Rod
2. Refer to the “Tool Change” section to remove the current tool and install the 3D Probe Rod
3. Disconnect the Wired Probe and connect the 3D Probe Rod cable
4. Click Continue or press the main button to start automatic probe calibration
5. Follow the software guidance to complete the 3D probing process (see wiki.makera.com for details)
Note:
The 3D Probe Rod only works with conductive materials. The workpiece must be electrically connected to the aluminum table via locating pins, screws, or other conductive methods.
¶ Status Indication
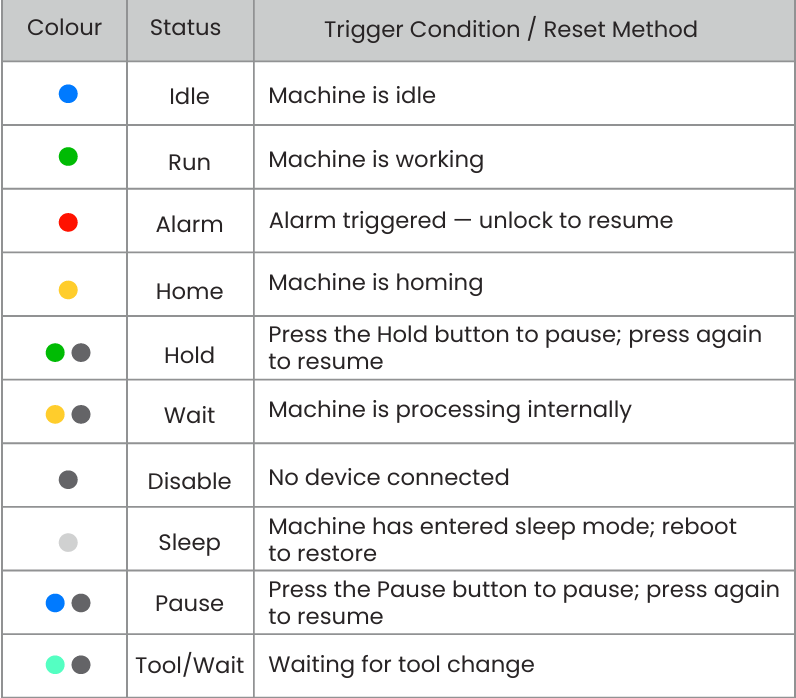
The LED indicator on the Makera Z1 (Z1 & Z1Pro)spindle cover displays the machine status, such as idle, running, and alerts.
It also features segmented lighting to indicate the active tool number during tool changes.
¶ Setting Up the Machine
¶ Install Software
Scan the QR code to download Makera Studio and the Makera App. Design and generate toolpaths on your computer, then control the machine from your computer or mobile device.
https://www.makera.com/software

¶ Power On
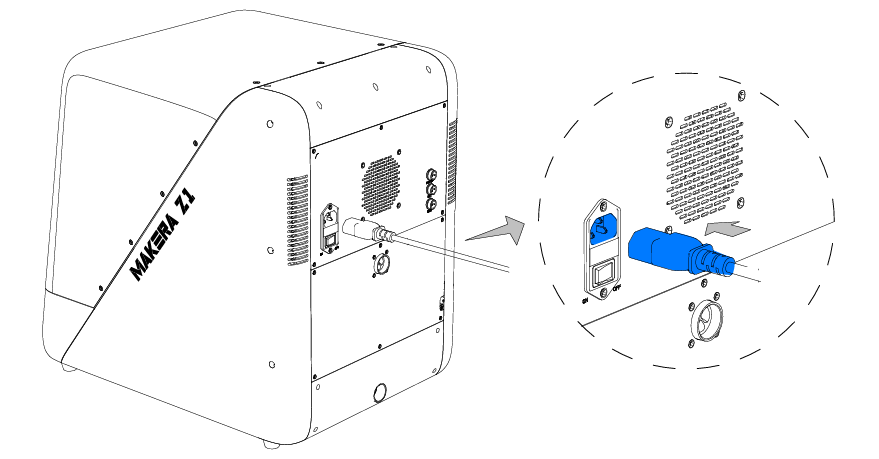
Plug in the power cable and turn on the switch. Makera Z1(Z1 & Z1Pro) will home all axes automatically, and the illumination light will stay blue (idle).
¶ Wi-Fi Setup and Machine Connection
Wi-Fi Setup
You can connect to and control the machine via USB, the built-in Wi-Fi hotspot (AP mode), or a local Wi-Fi network. We recommend connecting the machine to your local Wi-Fi network.
This allows your computer or mobile device to stay connected to the internet while remotely operating the machine.
Set Up via Bluetooth
1. Turn on Bluetooth on your computer or mobile device.
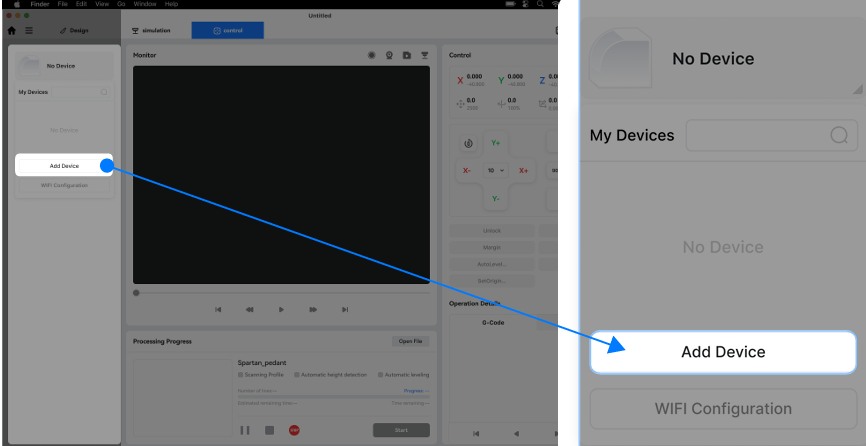
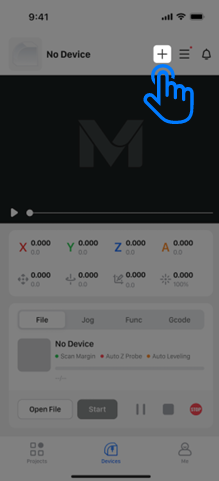
2. Open the ‘Control’ tab in Makera Studio (desktop), or the ‘Device’ page in the Makera App (mobile), then tap Add Device
3. Select ‘Setup via Bluetooth’, and choose your Makera Z1 Machine from the list.
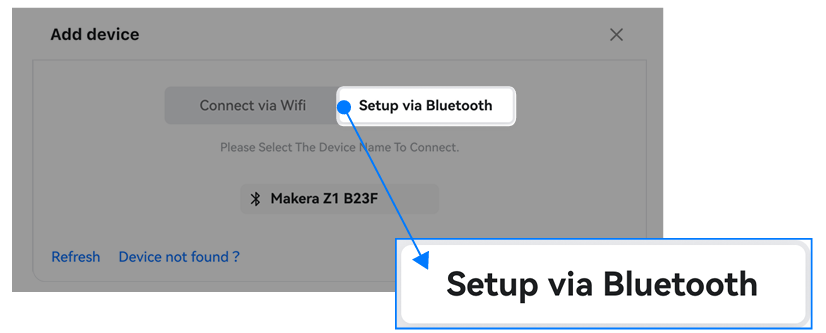
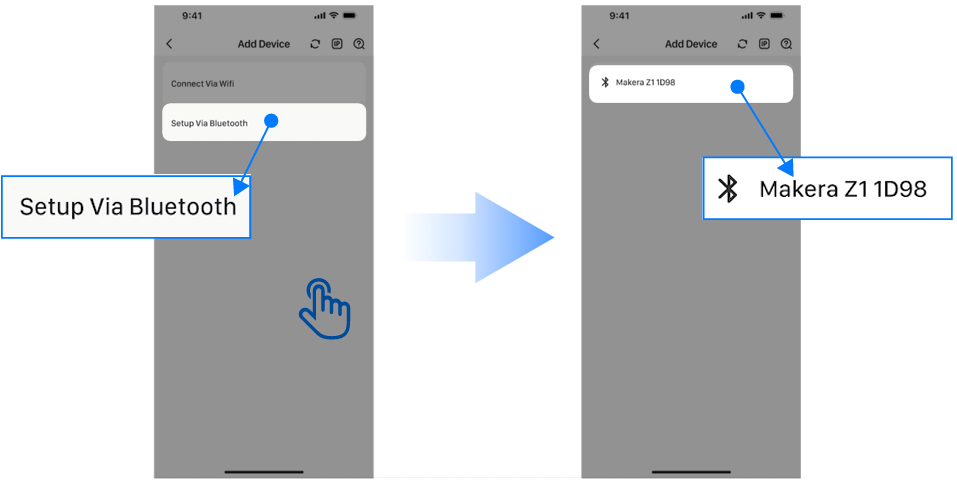
4. Select the Wi-Fi network you want to connect to, enter the password, and confirm.
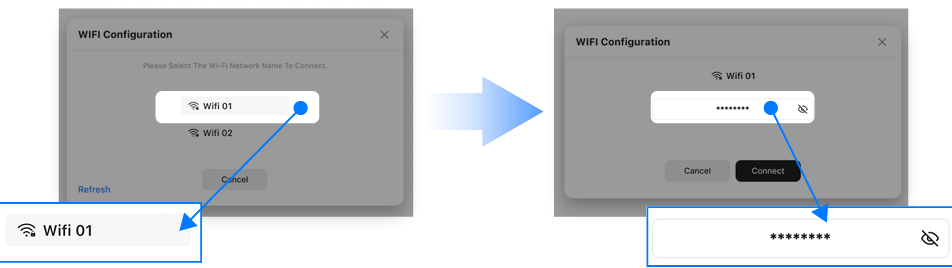
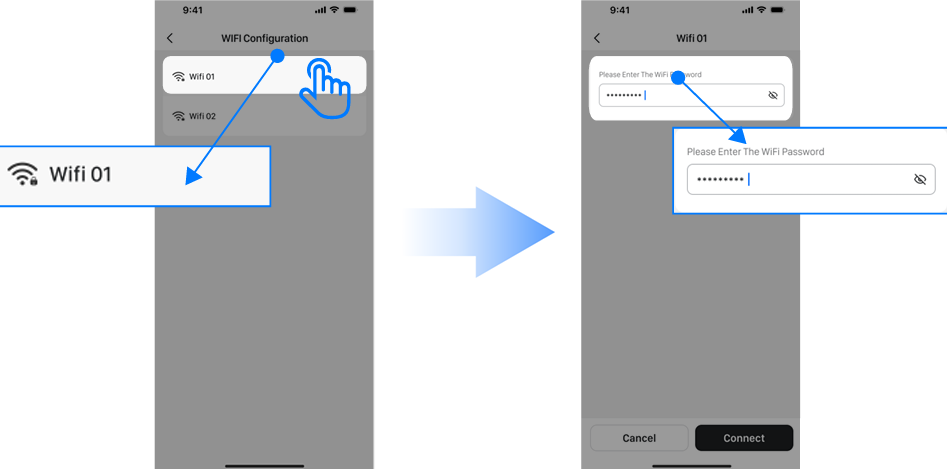
5. Once setup is complete, Makera Studio or the App will automatically connect to the machine and add it to the My Devices list.
Note:
After connecting to the machine, you can add or update its Wi-Fi network settings at any time.
For detailed software instructions, please visit wiki.makera.com.
Machine Connection
You can connect to the machine in the following three ways:
• Using a USB cable • Connecting to the machine’s built-in Wi-Fi hotspot (SSID prefix: Makera Z1)
• Connecting both your device and the machine to the same local Wi-Fi network
Connection Steps
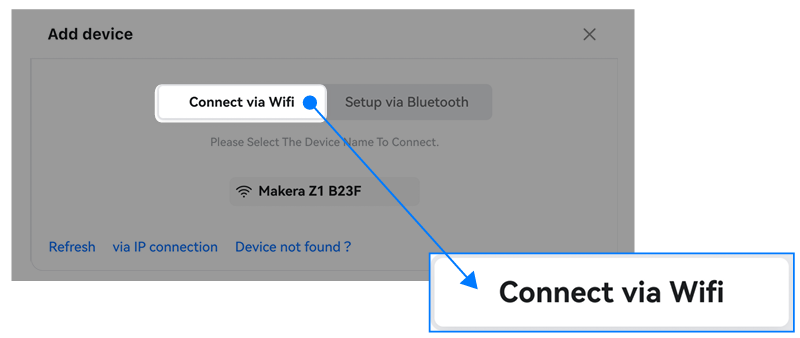
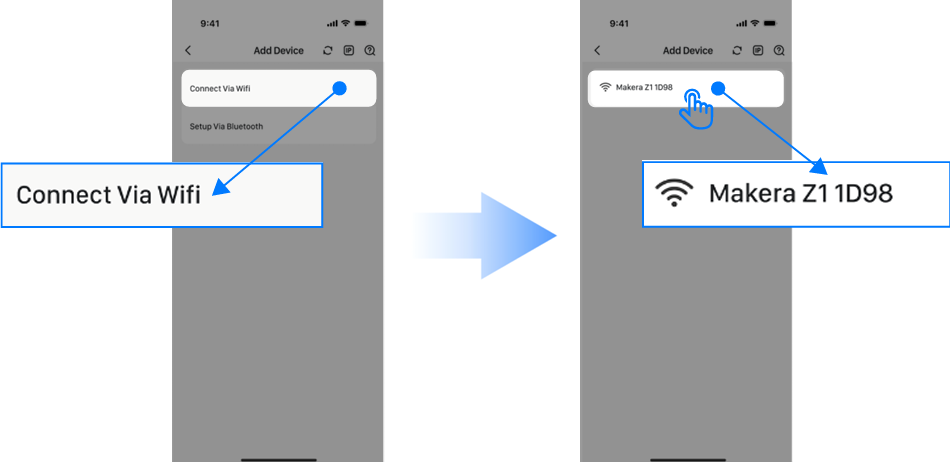
1. Open the Control tab in Makera Studio, or the Device page in the Makera App. If the device has already been added, or is connected via USB, you can connect directly from the device list
2. If the device has not been added yet, tap ‘Add Device’
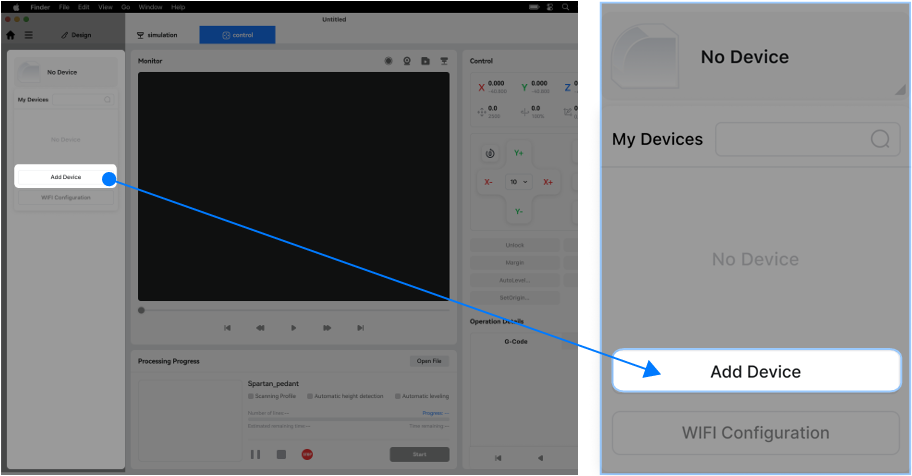
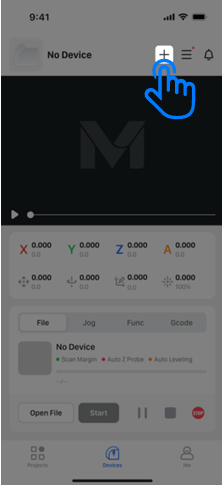
3. Select ‘Connect via Wi-Fi’, then choose your Makera Z1 device from the list
4. Once connected, Makera Studio or the App will automatically connect to the machine and add it to the Devices list
Note:
For detailed software instructions, please visit wiki.makera.com
¶ Your First Job
Your Makera Z1 is ready to go! Let's start with your first machining project.
A toolpath for the Aluminum Top Clamp is preloaded on the machine. This example will guide you through the basic Z1 workflow.
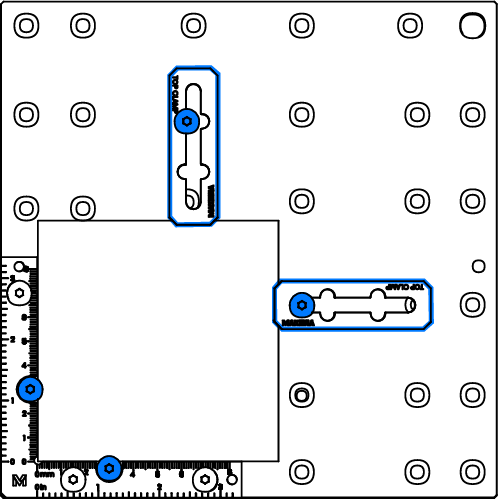
1. Secure the Material: Use four M5×20 screws and two top clamps to firmly secure the included 100 × 100 × 5 mm aluminum plate at the position shown.
2. Open the Project: Open Makera Studio or the Makera App and connect to your Z1. Go to File Storage and select: Examples → TopClamp.nc
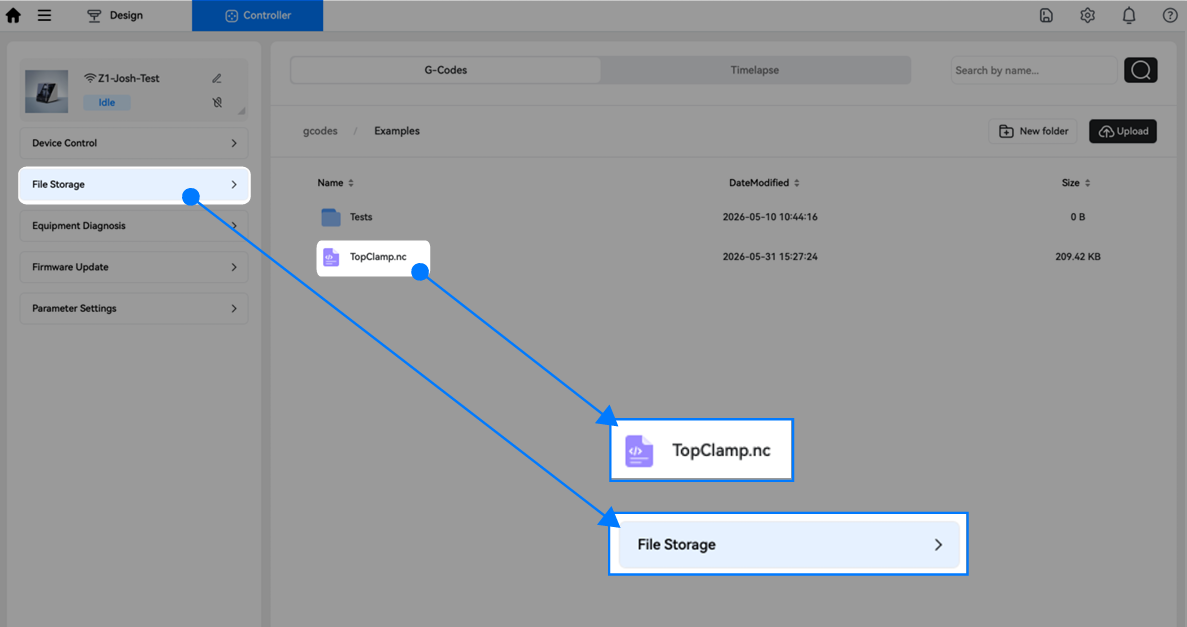
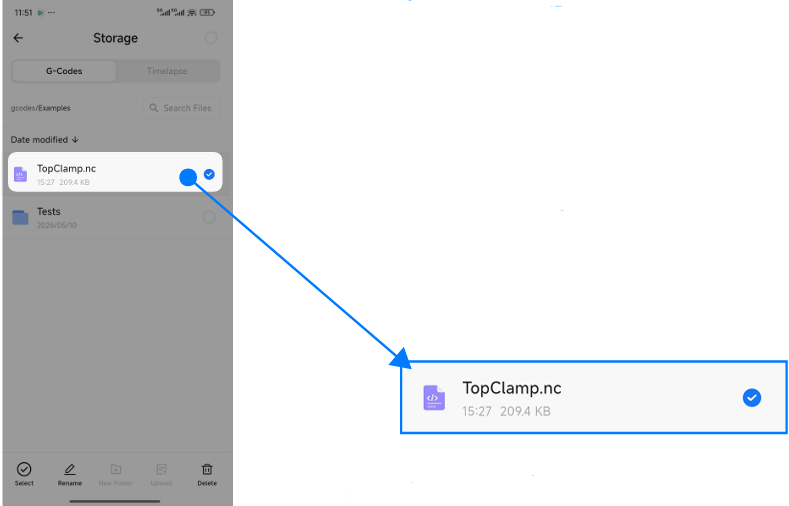
If you can’t find the file, download the NC file first, then upload it to your machine here: TopClamp.nc
3. Start the Job:
- Click ‘Start’
- Enable ‘Auto Vacuum’ to automatically start the Makera Dust Collector or Dust Collector Lite
- Enable ‘Auto Blow’ to activate spindle air blowing
- Enable ‘Auto Bed Clean’ to automatically clean the work area after machining
- Set Work Origin relative to Anchor 1, with X Offset = 0 and Y Offset = 0
- Enable ‘Scan Margin’ to verify the machining area and check for possible interference.
- Enable ‘Auto Leveling’ and set: X Probe Points: 3, Y Probe Points: 3, Probe Height: 2 mm
- Click ‘Run’
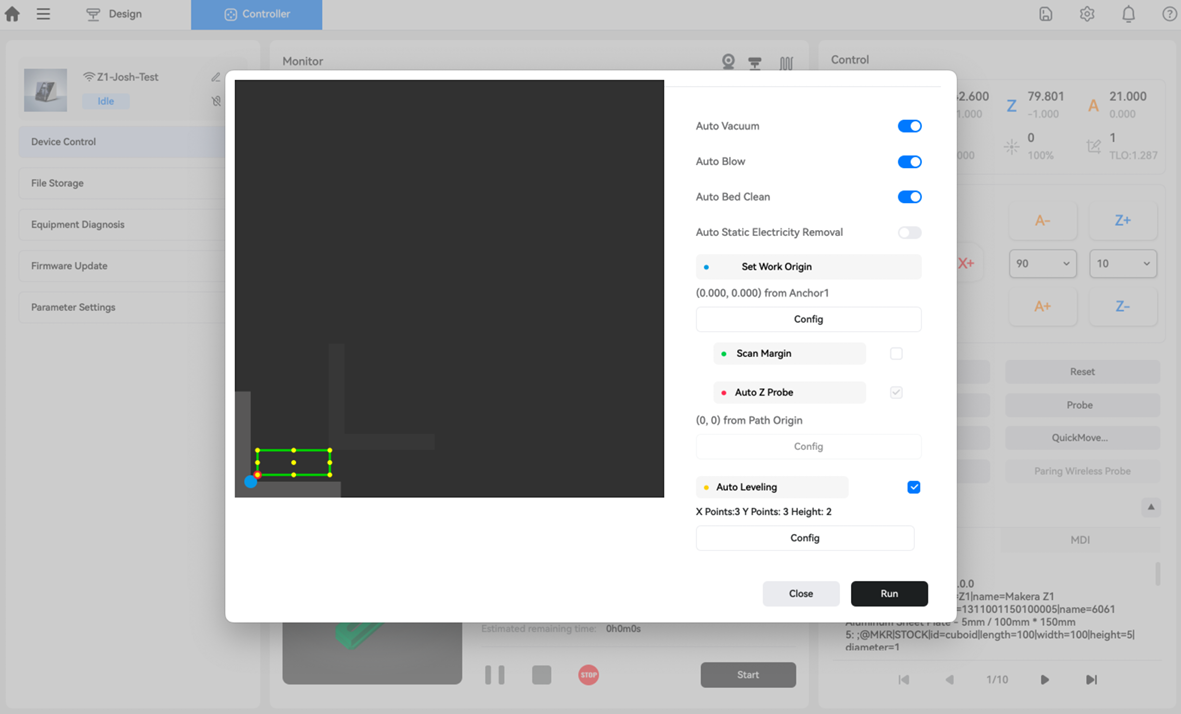
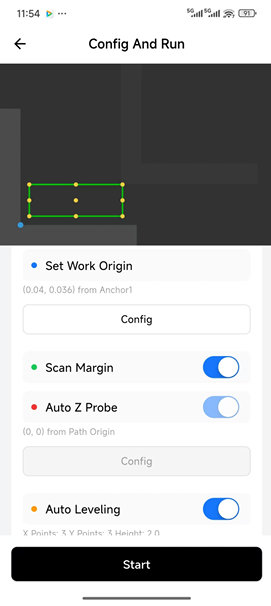
4. Quick Tool Change: When prompted, install the wired probe or the required tool, then click Confirm in the software or press the machine's front button to continue. This project uses Tool #1 — 3.175 × 12 mm Single-Flute Spiral Bit for Metal.
5. Post-Processing: After machining, use the included multi-function screwdriver to remove the tabs and smooth the edges with the file. Congratulations! Your first practical DIY project is now complete.

Scan the QR code below or visit
makerables.com/OfficialTutorials
Browse more official projects and follow the instructions to create your own.
¶ Next Steps
For detailed instructions on operation, software, maintenance, and troubleshooting, please visit our official Wiki and select Makera Z1(Z1&Z1 Pro).
The latest this guide is available on our website. If you encounter any issues, feel free to contact us.
You can purchase accessories, tools, and materials from our official store as needed.
Join our community to exchange ideas, share your projects, and get inspired by others around the world.